Google Cardboard DIY Virtual Reality Headset
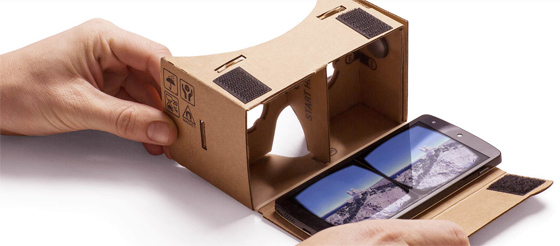
Image Google_Cardboard.jpg
Google Cardboard Virtual Reality Headset

Reactions from people who viewed Google Virtual Reality

Virtual reality is about to change entertainment, information consumption, possibly the way we interact with the world. As Google says “Visit new places, play immersive games, fly through space and more.” This Google Cardboard DIY Virtual Reality Headset is something you can build from cardboard. Add two cheap lenses, a magnet and your smart phone and you have a virtual reality headset for peanuts. The free Cardboard app from Google has already been installed on at least one million Android smartphones.

The app includes demos such as:

• Earth: Fly where your fancy takes you on Google Earth.
• Tour Guide: Visit Versailles with a local guide.
• YouTube: Watch popular YouTube videos on a massive screen.
• Exhibit: Examine cultural artifacts from every angle.
• Photo Sphere: Look around the photo spheres you’ve captured.
• Windy Day: Follow the story (and the hat) in this interactive animated short from Spotlight Stories.

Google Inc. wants Android to be the operating system for virtual reality. They are working on a new secret version of Android that might well power the next wave of major gadgets. Their new VR version of Android would be freely distributed just like Android is for smartphones, tablets, and wearables.

The race is on. Some of the companies which are developing VR products include: Facebook which recently purchased Oculus VR for $2 billion, Samsung, Microsoft’s amazing Holographic Goggles, HTC and Sony which has Morpheus for the PS4 which they recently previewed.

Virtual reality is about to change our world in a big way. This goes way beyond games and entertainment. Engineers could make repairs remotely. Manufacturers could produce products outside their own factory, controlling machines remotely while seeing the objects in front of them. And surgeons could perform surgery remotely. Colleges could provide a remote immersive experience. Imagine what kind of video you could produce. 4K video would seem like black and white Standard Definition.


The post Google Cardboard DIY Virtual Reality Headset appeared first on VideoUniversity.

SOURCE: VideoUniversity - Read entire story here.

Broadcaster Mini Turns Any HDMI Camera Into A Wireless Streaming Device

Image LivestreamMini.jpg

Turn An HDMI Camera Into A Wireless Streaming Device
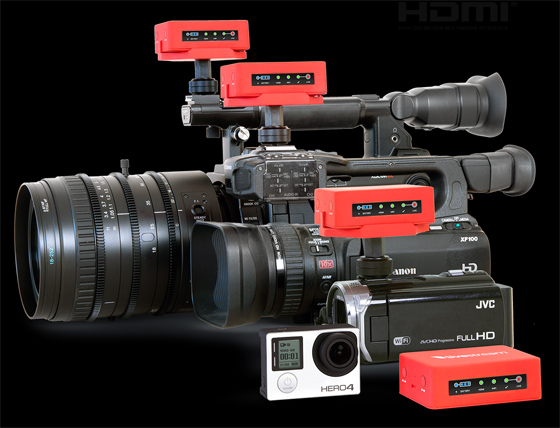
The Broadcaster mini turns any HDMI camera into a wireless live streaming device for less than $300.

To setup and control the free Livestream app you must have an iPhone, iPad or Android device in addition to a HDMI camera. The Broadcaster Mini Micro-HDMI input supports 1080i/720p/576p/480p (Pal & NTSC). It does H.264/AAC encoding up to one stream of 1080p 4Mbps. The Mini also features a built-in wireless 802.11 a/b/g/n (2.4Ghz/5Ghz). The internal rechargeable Li-ion battery can power over 2 hours of live streaming. Check out the Livestream Broadcaster Mini | HDMI Camera Live Streaming Device

For more information visit the Livestream Web Site.

The post Broadcaster Mini Turns Any HDMI Camera Into A Wireless Streaming Device appeared first on VideoUniversity.

SOURCE: VideoUniversity – Read entire story here.

Make Night Art with a Quadcopter

Image Light_painting_screw.jpg

Photographing light trails at night has been a popular technique of both still photographers and videographers. We’ve all seen the light trails of night traffic in a time lapse video. Light painting in still photography can be done a couple of ways. One way is to take a long exposure and move the lights during the exposure. That’s is what is being done in the video above. Another way is to move the camera during a long exposure.

The video above shows making time lapse still photos, rather than video. And in this case the Phantom Quadcopter is not the camera car; it is the camera subject.

Flying a UAV at night introduces additional safety issues so fly in an open field far from civilization. If you are going to make night art with a quadcopter, think about the safest way to do this. And prepare to land at a moment’s notice if for some reason the Phantom lights failed.

Light Painting With A Quadcopter
Light Painting Screw, by Karsten Knöfler (Own work)
https://commons.wikimedia.org/wiki/User:KKnoefler247
Wikipedia Creative Commons http://creativecommons.org/licenses/by/3.0 via Wikimedia Commons
https://commons.wikimedia.org/wiki/File%3ALight_painting_screw.jpg


The post Make Night Art with a Quadcopter appeared first on VideoUniversity.


SOURCE: VideoUniversity – Read entire story here.

Digital Bolex is Available

Image digitalbolex2.jpg
Digital Bolex Ships

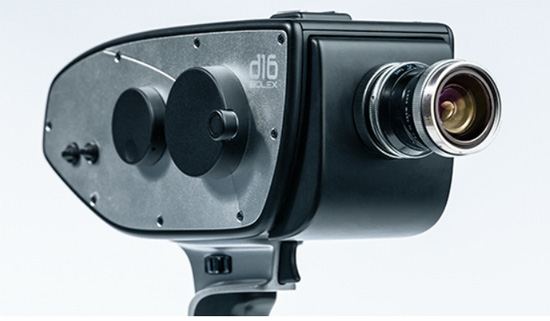
The Digital Bolex D16 cinema camera was originally funded on Kickstarter as we reported back in 2012.It is shipping now. This 2k camera makes cinematic quality video and the prices start at $3000. This beautifully shot promo shows off what the D16 can do. https://vimeo.com/digitalbolex/cinemaquality.

That was projected on the big screen at the Downtown Independent in Los Angeles to show the cast footage that was shot the previous day on set. Like its film namesake the Digital Bolex has a C-Mount lens port. It accepts a wide variety C-Mount lenses, both vintage and modern.

The Digital Bolex D16 has a Super 16 CCD Sensor with Global Shutter (which prevents the jello-cam effect on fast moving subjects or when panning.). This color sensor has 12 Stops of Dynamic Range. It can capture 2048 x 1152 (Super 16mm mode) or 1920 x 1080 pixels (16mm mode), Color depth 12 bit 4:4:4, 12-Bit Adobe Cinema DNG (RAW)

The Super 16mm-sized CCD sensor processes images differently from CMOS sensors. Onboard storage options include 256GB, 512GB, or 1TB Hard Drive for up to 3 hours recording time in 2K or 4 hours in 1080. The camera starts at $3000 without lenses. Bolex prime lenses start at $350. The Digital Bolex is available now. For more information visit Digital Bolex.


The post Digital Bolex is Available appeared first on VideoUniversity.

SOURCE: VideoUniversity - Read entire story here.

Cheerson CX-20 Review on The Auto Pathfinder Model

Image Cheerson-CX-20-Review-and-Assessment-.jpg

Cheerson CX-20 Review and Assessment

[taq_review] [wpsm_button color=”blue” size=”big” link=”http://www.amazon.com/gp/product/B00N77KH5G/ref=as_li_tl?ie=UTF8&camp=1789&creative=390957&creativeASIN=B00N77KH5G&linkCode=as2&tag=secdooforhom-20&linkId=DJLGRG3EN4FBXSS3″ target=”_blank” rel=”nofollow” ]Click Here to Purchase the Cheerson CX-20 from Amazon[/wpsm_button] Our Cheerson CX-20 Review and Assessment on The Cheerson CX-20 Auto-pathfinder Quadcopter Model. Immediately upon we first notified this cheerson cx-20 quadcopter model, were excessively astonished at the varied differential names used calling this Cheerson CX-20. There were various approach of scribbling the cx-20 cheerson model number, and it looks like alternative companies were also building fakes of this product and offering absolutely various names as well. What we realized from the thread discussion on the RC forum Group (Accessible Here) were the max useful. We convincingly discovered the model with the genuine box kit it would be gaining upon, and the name in the topmost called it the “Cheerson CX-20 Auto-pathfinder”. We in one’s own view not assured whether the name “Cheerson CX-20″ or cheerson cx-20 open source is just the name of the quadcopter sequence or the name of the association or the agent. Considering all the detail noticed on this model sound to have it cataloged as the Cheerson CX-20 RC Quadcopter, at the moment we are also going to refer the product that specific name. Read Our below structured Cheerson CX-20 Review straightaway. Full Cheerson CX-20 Review and Analysis First, we need to realize the name of this model right on. The authenticate name or it is literally the CX-20 Auto Pathfinder” nevertheless there are different alternative names this specific model drive under. Here is the Cheerson CX 10 Quadcopter Review just in case. Those are… The Hobby King Quanum Nova – Members at Hobby King assumed to have re-branded the Cheerson CX-20 seeing that it has not looked to have purchased very good before. Toyabi CX-20 Auto Pathfinder (HK-TF2932) There again was a third model name labelled the “CX-20 Sky Explorer Firebird Quadcopter” although that was from a YouTube Video we had seen. [wpsm_divider top=”20px” bottom=”20px” style=”solid”] Getting Started With Cheerson CX-20 Review [wpsm_list type=”star”] Model Name: Cheerson CX-20 Zero Version Auto-pathfinder Quadcopter RTF Manufacturer Website: Cheerson Toy & Hobby Technology Description: Cheerson CX-20 Reviews Duration of Flight: Approximately 15 minutes Charging Period: Approx. 2 Hours (120 minutes) Frequency Communication: 2.4GHz (Gigahertz) Batteries: 11.1V 2500mAh Lithium Rechargeable Battery Transmitter Controller Model & Brand: CX-20 Battery For The Transmitter: four 1.5V AA Batteries required (Not Included) Control Distance and/or Range: Approximately 300 meters Color: White Body Material: ABS Plastic Material Suitable for: Ages 14+ – Manufacturer’s advise Dimensions: (30 x 30 x 20) cm  Max vertical speed: 6 m/s (miles per second) Cheerson CX-20 Manual Included? Yes Current Cheerson CX-20 Cx20 Auto-pathfinder Price: $365.55 (cheerson cx-20 price may change) Where To Buy Cheerson CX-20 Parts: Click Here To Order CX-20 Replacement Parts from Manufacturer’s Official Amazon Store. Where To Buy (Cheerson CX20 Quadcopter for Sale): The Cheerson CX-20 RC Quadcopter is in stock and ready for add to cart on Amazon.com: Amazon – Click Here To Buy the Cheerson CX-20 RC Quadcopter from Manufacturer’s Official Amazon Store. [/wpsm_list] [wpsm_divider top=”20px” bottom=”20px” style=”solid”] What the Cheerson…

Cheerson CX20 Auto-Pathfinder FPV RC Quadcopter Overview

Flight Control System

Stability

Flight Time

Charging Time

Quality

Control

Value For Money


Thrilling

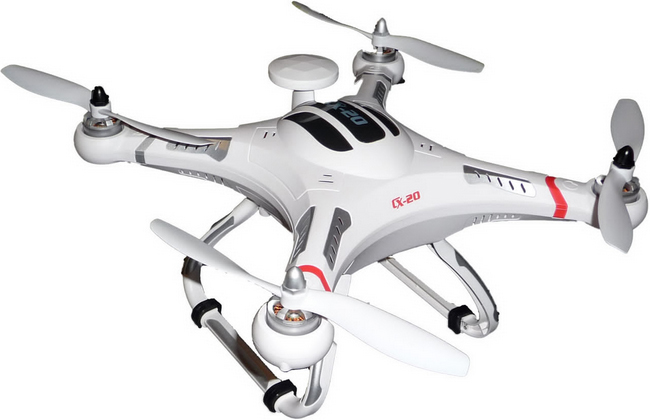
The article current is about Cheerson CX-20 Auto-pathfinder RC Quadcopter, which is a specially and advanced designed quadrotor. Most Radio Control (RC) enthusiast has been appeal to it acutely. This Cheerson CX-20 Quadcopter is a DJI Phantom clone with an exceptional cost, has Global Positioning System, single button arrival home, elevation hold, GoPro HD camera mount, headless flight, manual mode and stable mode. This is the latest Quadcopter in its cost scope for aerial photography and first person flight. This analysis concentrates on its performance, features and package, enabling you to get a brief idea of what this model is in reality like.

User Rating: 2.36 ( 243 votes)

79

Click Here to Purchase the Cheerson CX-20 from Amazon

Our Cheerson CX-20 Review and Assessment on The Cheerson CX-20 Auto-pathfinder Quadcopter Model. Immediately upon we first notified this cheerson cx-20 quadcopter model, were excessively astonished at the varied differential names used calling this Cheerson CX-20. There were various approach of scribbling the cx-20 cheerson model number, and it looks like alternative companies were also building fakes of this product and offering absolutely various names as well.

What we realized from the thread discussion on the RC forum Group (Accessible Here) were the max useful. We convincingly discovered the model with the genuine box kit it would be gaining upon, and the name in the topmost called it the “Cheerson CX-20 Auto-pathfinder“. We in one’s own view not assured whether the name “Cheerson CX-20″ or cheerson cx-20 open source is just the name of the quadcopter sequence or the name of the association or the agent.

Considering all the detail noticed on this model sound to have it cataloged as the Cheerson CX-20 RC Quadcopter, at the moment we are also going to refer the product that specific name. Read Our below structured Cheerson CX-20 Review straightaway.

Full Cheerson CX-20 Review and Analysis

First, we need to realize the name of this model right on. The authenticate name or it is literally the CX-20 Auto Pathfinder” nevertheless there are different alternative names this specific model drive under. Here is the Cheerson CX 10 Quadcopter Review just in case. Those are…

  • The Hobby King Quanum Nova – Members at Hobby King assumed to have re-branded the Cheerson CX-20 seeing that it has not looked to have purchased very good before.
  • Toyabi CX-20 Auto Pathfinder (HK-TF2932)
  • There again was a third model name labelled the “CX-20 Sky Explorer Firebird Quadcopter” although that was from a YouTube Video we had seen.


Getting Started With Cheerson CX-20 Review

  • Model Name: Cheerson CX-20 Zero Version Auto-pathfinder Quadcopter RTF
  • Manufacturer Website: Cheerson Toy & Hobby Technology
  • Description: Cheerson CX-20 Reviews
  • Duration of Flight: Approximately 15 minutes
  • Charging Period: Approx. 2 Hours (120 minutes)
  • Frequency Communication: 2.4GHz (Gigahertz)
  • Batteries: 11.1V 2500mAh Lithium Rechargeable Battery
  • Transmitter Controller Model & Brand: CX-20
  • Battery For The Transmitter: four 1.5V AA Batteries required (Not Included)
  • Control Distance and/or Range: Approximately 300 meters
  • Color: White
  • Body Material: ABS Plastic Material
  • Suitable for: Ages 14+ – Manufacturer’s advise
  • Dimensions: (30 x 30 x 20) cm 
  • Max vertical speed: 6 m/s (miles per second)
  • Cheerson CX-20 Manual Included? Yes
  • Current Cheerson CX-20 Cx20 Auto-pathfinder Price: $365.55 (cheerson cx-20 price may change)
  • Where To Buy Cheerson CX-20 Parts: Click Here To Order CX-20 Replacement Parts from Manufacturer’s Official Amazon Store.
  • Where To Buy (Cheerson CX20 Quadcopter for Sale): The Cheerson CX-20 RC Quadcopter is in stock and ready for add to cart on Amazon.com: Amazon – Click Here To Buy the Cheerson CX-20 RC Quadcopter from Manufacturer’s Official Amazon Store.


What the Cheerson CX-20 Package Includes:

  • CX 20 Quadcopter
  • Balance Charger
  • Remote Control
  • (4) Propeller
  • (2) Aircraft Support
  • Camera Support
  • User Manual
  • (1) Li-po Battery

Considering down on the model, it remind the type of like the DJI Phantom or the Blade X350, by the white exterior cover color. All three of these models are extensive size type. The closeness for the three models terminate upright there. Nonetheless, out of all three, the Dji Phantom Vision v2.0(authentic and the advanced 2nd generation Vision sort) is the one with HD cameras pre-installed.

This version has no camera, and that is apparently its considerable issue. Right now, of course there will forevermore be a mount of HD camera which you can order to blend with it, on the other hand camera is not part of the kit when you buy the certain Unmanned Aerial Vehicle (UAV) kit. We noticed around to look which camera is adaptable with this specific model and there is a unit we noticed on Amazon.com “5 Mega-pixel Camera 720P” sold by person of influence called Nat. The cost for the five mega pixel (at 720p high-definition) camera is presently around $125. (Hint to here)

Check out the CX-20 model on Amazon.com here!


To what degree this model charge?

cheerson cx-20 auto-pathfinderTo know the current cheerson cx-20 price, straightaway read this Cheerson CX-20 Review part. At present, all the main online RC toy stores include this cx 20 quadcopter model in portfolio. It looks that when we set side by side price comparison of all the area, it is Amazon.com which has the finest discount price. A few people from the online forums attempted to buy it, and the list price of just the model looked to decrease to about $330, before present tax.
So that rather great deal, in consideration of how much functions the cx 20 quadcopter has. It indicates that a sum of over 180 units of this same model has sold by this time. The some assessment which have come back have been often positive. Go ahead with our Cheerson CX-20 Review to know more about the cheerson cx-20 quadcopter.
This model looks to be one of those high-end versions that only certain sort of consumer might ever want to buy. The ordinary person who is considering to get a gift or present for a family member for the celebration alike Christmas will apparently not be upsetting to get it. It is simply too enormous, and expensive. Models similar to this one is relatively always deployed for surveillance and security plan. Seeing that this model does not looked to feature the on-board camera incorporated, it means that the cost you could literally be settling to use it in its entire functionality and feature is more anticipated going to be somewhere between $560-$630, along with the camera.

We carried out a bit Google searching to find-out which company in reality produce the model. Is it manufactured and designed by any hobbyist in their store in the Europe or USA or is the model mass created in any factory outlet in China? That answer we not at all received. Without the owner’s manual or a company official website, we cannot get other details on this specific model. We did not buy this specific model our own selves yet so we do not acquire any talent in flying the cheerson cx-20 quadcopter around.


So what is our long-term analysis on the Cheerson CX-20 model as yet?

Until now, the model has fascinated us with all the fundamental functions one could want from a upper-end quality sort of surveillance cx 20 drone. It is entirely Global Positioning System (GPS) Guided, can also fly auto-pilot, and has the feature of coming back to “Home” or its real take-off place if the model becomes too deep apart from you and the binding process among the cheerson cx-20 cx20 auto-pathfinder and the controller/transmitter is broken. So it is “intelligent”, similar to the Dji line of quadcopters. We prefer this model, even if it does not come with a camera. This concludes our Cheerson CX-20 Review.

Ready to fly? Purchase the CX-20 on Amazon

We searched this YouTube video of Cheerson CX-20 uploaded by this guy called “Charles Phillips” that present the CX-20 up on the sky outside in

SOURCE: Best Quadcopters Reviews – Read entire story here.

4 hour fuel cell powered quad

Image Hycopter.jpg

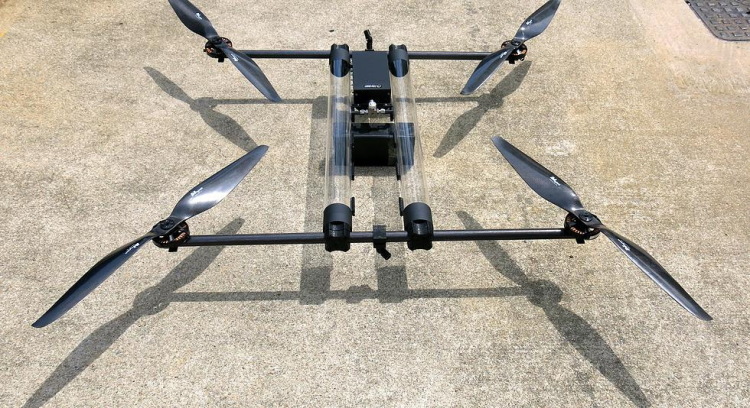
Singaporean company Horizon Unmanned Systems (HUS) unveils HYCOPTER, the world’s first hydrogen fuel cell powered multi-rotor UAV. HYCOPTER is being readied for a record flight endurance of 4 hours, or around 8 to 10 times the average flight duration of equivalent systems today …

AUVSI: Horizon Unveils the World’s First Hydrogen Powered, 4H-Endurance Multi-Rotor UAV

Even  if it doesn’t quite make 4 hours, this is very impressive.

Two hours and 20 minutes with 1kg payload …

SOURCE: Everyone’s Blog Posts – DIY Drones – Read entire story here.

Automated land cover classification for conservation and habitat monitoring

Image Untitled2.jpg

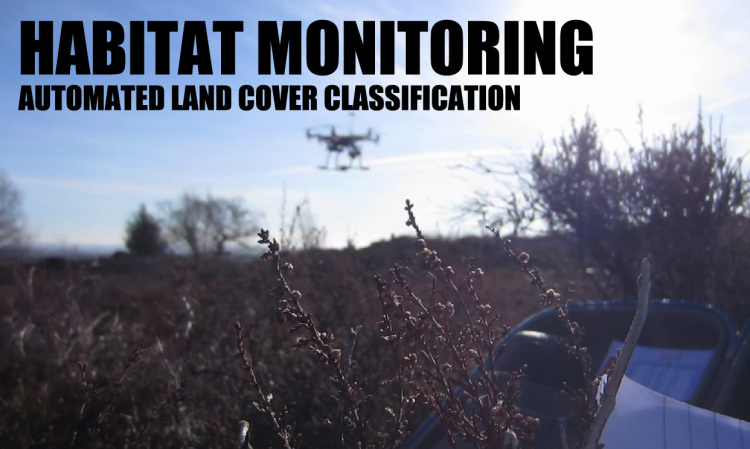
I posted the results of my research into using a small UAV for land cover classification for habitat monitoring a couple of months ago.

I’ve created a short video as part of my research presentation that details the workflow used to analyse the image data and thought it may be of interest to the community. I’m more than happy to have a conversation about the project in the comments :)

SOURCE: Everyone’s Blog Posts – DIY Drones – Read entire story here.

Pixhawk 250 Quad

Image 1b.JPG

Hey guys,

Thought I’d share the latest Pixhawk build. This little guy is a work in progress but so far the results are great. It’s surprisingly stable and the battery lasts about 6minutes will full gear.

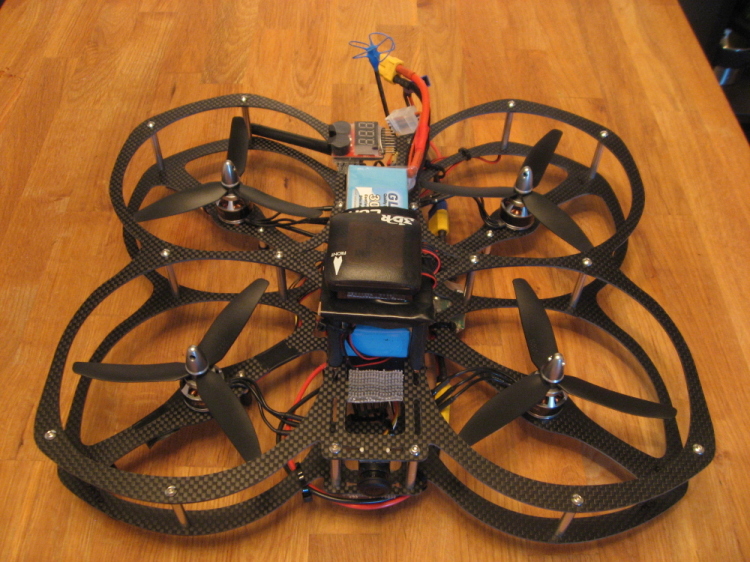
Even with the enclosed prop frame, FPV gear, Pixhawk + GPS + Telemetry, 2600mah 3S battery, Tmotors, and 12a OPTO this only weights 790grams. I’ll share more details, video and the build photos if anyone is interested.

Happy droning, Tedro

SOURCE: Everyone’s Blog Posts – DIY Drones – Read entire story here.

SF30 LRF – how fast is fast enough for obstacle detection?

Image Elasticband.JPG

Developing a new product starts with a pretty clear idea of what you expect the finished thing to do. Mathematically, you can can work out the expected performance and logically you can understand how this performance translates into useful applications. But I’m always fascinated by the qualitative feel of a product, that intangible experience that makes you think “Wow, that is so cool!”

I’d like to share a few experiences that I had during the testing of our new SF30 laser range finder. We decided to make a laser sensor that could measure so fast that even narrow obstacles like overhead power cables could be detected reliably, even from a moving UAV. Additionally, we wanted the SF30 to produce high density point clouds when used in a scanning system. We felt that without this high level of performance, reliable obstacle detection and collision avoidance would be impossible.

Quantitatively, we knew that the SF30 could measure 36633 times per second. What we didn’t know was how that “felt” in practice. The yellow ‘scope trace above shows the data output from the serial port of the SF30. The baud rate is 921600 and on the blue trace you can see a synchronization marker.

Looking at this high speed data stream for the first time, we couldn’t get a feeling for what an obstacle with a high relative velocity would look like. We were also concerned that there weren’t many embedded processing platforms available that could make obstacle detection decisions within the 27 microseconds between readings, whilst flying a UAV.

So we added an old fashioned analog output with an alarm that has a programmable activation distance. In the image below the yellow line is an analog representation of the measured distance and the blue line is an active low alarm that warns of a close obstacle.

Qualitatively, this is a much clearer picture of an obstacle than the earlier data stream and we can see that the obstacle was in front of the SF30 for about 4 milliseconds. So here’s the cool part. The obstacle is an elastic band flicked at full force through the laser beam. The band was traveling at about 20 meters per second and the SF30 hit it 137 times.

My immediate response to this result was – this is going to work! My intuitive understanding of what it takes to hit a small obstacle from a fast moving platform is that you need to hit it lots of times to be absolutely certain that it is a real threat. Hitting the fastest thing that I could find 137 times is just amazing.

Of course, the next issue is how the host controller is going to catch a fast alarm signal. Certainly much more easily than a fast data stream but how about latching the alarm until the controller is ready to acknowledge it? In the image below, the blue alarm line has stayed low after the obstacle detection event. The alarm is reset by a command from the host sent through the serial port.

So now we end up with a remarkable solution to detecting obstacles that have a high relative velocity. On the one hand, the SF30 can measure even small obstacles many times no matter how fast they are moving. On the other hand, a simple alarm signal can warn the UAV about the presence of an obstacle without occupying all the processing capacity of the flight controller.

SOURCE: Everyone’s Blog Posts – DIY Drones – Read entire story here.

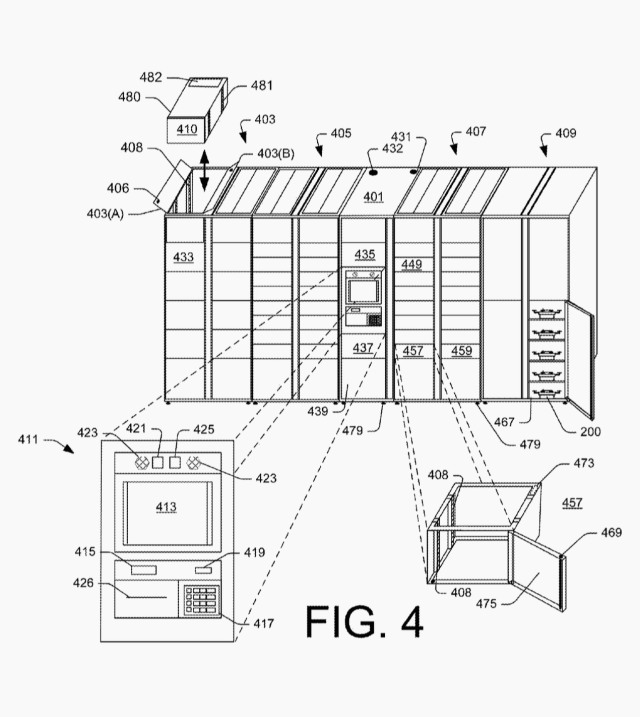
Patent application for Amazon’s drone mothership

Image colorcorrected28.jpeg

From Quartz

In a patent application from last month, uncovered by the BBC yesterday, Amazon outlined a plan for its proposed delivery drones to get packages to you in half an hour, regardless of where you are.

Up to now, Amazon’s drone plans have suggested they would arrive at your doorstep, dropping off packages like a smaller, louder mailman. But Amazon’s application suggests the company is exploring ways to have its drones come directly to wherever your smartphone is.

The application outlines a process whereby an Amazon customer orders something small—a book, perhaps, or maybe a box of Tide—via the Amazon app and selects the “Bring It To Me” delivery option. The nearest drone delivery system hopper would then saddle the drone with the order and deploy it to the location of the customer’s smartphone.

Once within range, the drone then will perform a controlled landing by somehow using the camera function of the customer’s smartphone to navigate a path from the sky to the ground. Exactly how is a little unclear, though the patent notes that the customer could theoretically land the drone herself. Presumably, though, the customer would have to make sure their phone was somewhere safe, in case the drone had to make a hard landing.

Not that landing is essential. The patent application suggests the drone wouldn’t have to actually touch the ground to drop off your delivery—it could just hover near you, release its package, and be on its merry way. The filing also says that Amazon wants to its drones to communicate with each other while in the air, “to share weather information, location information, routing information, landing areas.”

There are still a few hurdles that Amazon will have to clear before drones whiz through the skies bearing urgent deliveries of paperbacks and gluten-free pasta. There’s no guarantee that the US authorities will approve the patent, nor that Amazon will end up implement the technology if it does. The company is also still hoping for approval from the US’s aviation administration and other countries’ regulators for use of a drone program that wouldn’t require Amazon to keep drones within the line of sight of human operators. 

Phys.org adds:

Nate Swanner of SlashGear picked up on the patent discussion about how the drone may not only focus on delivering to a desired location but also communicate with one another, “sharing info on weather or landing zones. Those delivery drones may also share info on flight paths; for instance, they’d know a particular highway was gusty from big trucks based on their flight data, and fly a bit higher to avoid trouble or at an angle to ease its entry/exit from the airspace above the road next time, and share that info with other drones.”

The patent wording includes talk of a wireless mesh network which may be used to provide communication between UAVs (e.g., to share weather information, , routing information, landing areas), UAV management system, materials handling facilities, secure delivery locations and/or relay locations.


SOURCE: Everyone’s Blog Posts – DIY Drones – Read entire story here.

How to control a GoPro Camera on APM/Pixhawk with a Raspberry PI using WiFi

Image GoProControl.png

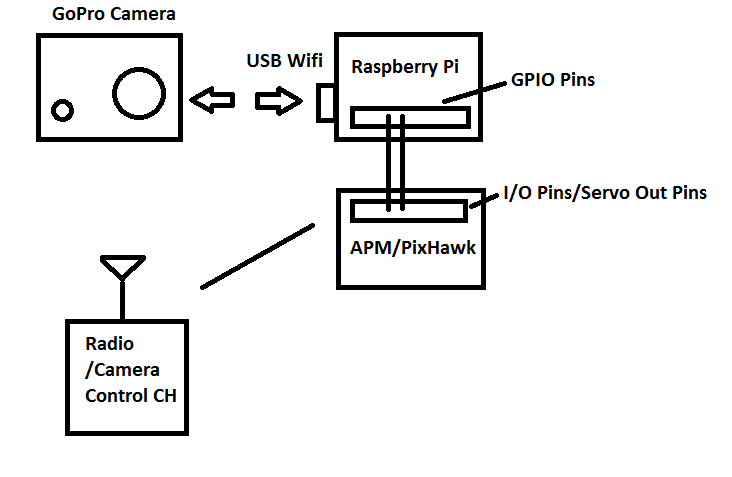
This post will describe how to control a GoPro camera (usually mounted on a gimbal), via a Raspberry Pi with a USB WiFi dongle. 

The ideal Raspberry PI for this setup is the A+ model because it is small and has the needed single USB port for the WiFi dongle. 

Parts List:

1 GoPro Camera 

1 Raspberry PI (suggest A+ model, but any PI will work)

1 USB WiFi dongle (PI approved) Suggest this one: AirLink N150

2 Jumper wires or 1 servo header that can plug into 1/10th center pins (with center power pin removed)

1 APM or PixHawk board

Of course, all of this is mounted on your Quad or Plane or whatever. On my hexicopter, the PI is powered by one of the ESCs UBEC outputs, where I cut a micro-usb cable and soldered the red‘ and ‘black‘ wires to the power output of the UBEC of the same color. The other two USB wires are not used.

Setup:

Step 1: Enable the GoPro WiFi access:

The first step in making all of this work is to configure your GoPro camera to accept a WiFi connection. The camera is actually a WiFI access point. 

The details on how to setup your camera is here. If you can connect the GoPro App to the camera, then you can connect the Raspberry PI. You should verify that the GoPro WiFi is working with the GoPro App BEFORE proceeding to connect the PI. You can pick a unique access point name for your camera and use the same name in the Raspberry PI configuration when connecting to the camera with the PI.

Step 2: Connect the Raspberry PI to the GoPro Camera’s WiFi:

Once you have established the camera’s access point and assigned a name and password, you can make an entry in your PI’s network configuration file to configure the connection.

From a shell prompt type the command:  sudo nano /etc/network/interfaces

Add some lines to the file as follows:

allow-hotplug wlan0

iface wlan0 inet dhcp
wpa-ssid “mygopro”
wpa-psk “mypassword”

Reboot the PI and it should automatically connect to the GoPro.

Step 3: Communicate with the GoPro

The GoPro camera should have the standard IP address of 10.5.5.9. If you can ping this address, you have successfully connected to the GoPro so now you are ready to send it commands.

The list of commands are here.  The camera is controlled by sending HTTP request commands in the form of a header string. 

for example, this string turns the camera on:

http://10.5.5.9/bacpac/PW?t=“wifipassword”&p=%01”

Where ‘wifipassword’ is the password you set when configuring your GoPro.

You can experiment with sending commands with a web browser to get familiar with how to control the camera with web requests or write your own scripts.

Step 4: Use a Python Script to Control the Camera

Attached is a sample python script that will listen for a signal on GPIO pin 5 on the PI header, and send a request to the camera to take a picture when triggered.

gopro.py

To use the code, start the python script after connecting to the camera with the following command:

sudo python3 gopro.py -photoMode

This will start the script with the camera set to take pictures. If you want it to trigger a video instead, leave out the ‘-photoMode’ option.

Step 5: Configuring APM or Pixhawk to send the signal to the PI

To use this setup with the APM or PixHawk control board, you need to connect the output of the ‘relay’ pin (A9 on the APM), to the GPIO pin 5 on the PI (or the pin of your choice).  The script is configured to use GPIO pin 5.

Here is a picture of the APM board from This link

The PI pinout is here

Connect Pin 29 (GPIO 5) on the PI to A9 (S) on the APM, and GND pin 30 on the PI, to GND A9 (-) on the APM.  Check the link on the APM website for the PixHawk settings for the relay output pins as I have not used PixHawk (yet).

Step 6: Configure your Radio to Trigger the Camera

In Mission Planner, you will need to select which channel on your radio to assign to trigger the camera input. 

This link describes how to configure the shutter.

Select “Relay” for the Shutter output (not RC10 as shown in the above image example).

Then set the Ch7 option to “Camera” as shown here:

This can also be set on the “Advanced Parameters” setup area.

Step 7: Start Script on Boot:

To make all of this automatic, you can configure your PI to always connect to the GoPro and start the script when the PI boots. Or you can do it manually when you want to fly. 

To make it automatic, you can modify your ‘/etc/rc.local’ file to make the script start on boot. Here is a sample rc.local file:

rc.local

Once you have completed all of these steps, you should be able to trigger the camera to take a picture with a switch assigned to Ch7 on your radio. 

If you want to GeoTag your images, you can follow the instructions at the ArduCopter GeoTagging page.

Happy flying.

SOURCE: Everyone’s Blog Posts – DIY Drones – Read entire story here.

Designing a VTOL Tiltrotor UAV

Image cruise10aoa200055.jpg

A big hello to all the intelligent lifeforms everywhere and to everyone else out there, the secret is to bang the rocks together.

I just want to update you all on my current project work. The design started by deciding the performance objectives for the UAV which are as follows:

  1. 30 min cruise endurance + 10 min VTOL + 5 min take off landing
  2. Around 15 m/s cruise speed and a flying altitude of 150 m
  3. An operational radius of 30 km
  4. A payload capacity of >2 kg which will include thermal/IR cameras etc.

The UAV configuration will comprise of 2 tilt-rotors which will be active during all of the flight phases and also one main rotor which will be just active during the VTOL and hovering phase. In the cruise mode, tiltrotors will be turned to the flight direction using simple servo motors and the power of the coaxial central motor will be boosted to provide necessary lift. Once the transition is completed, the central motor will be slowly turned off so as to maintain constant altitude and the duct will be closed to reduce drag.

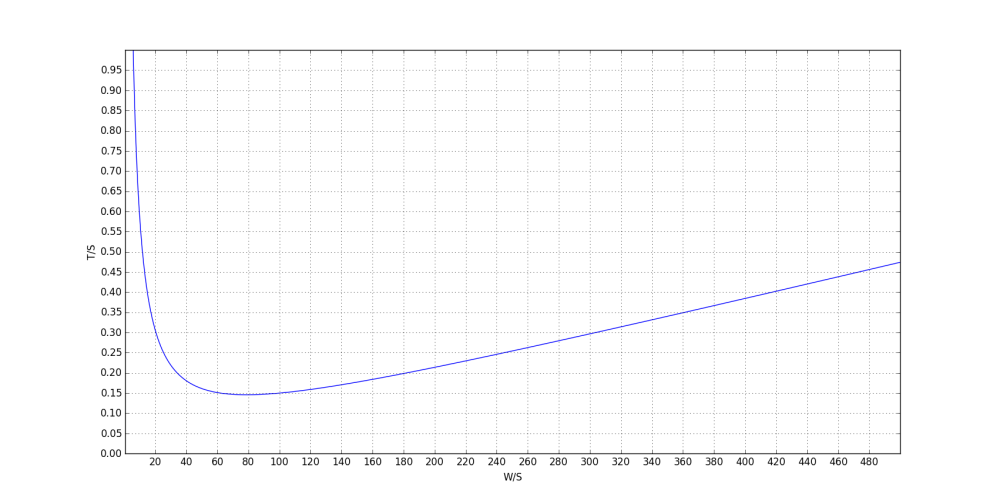
The above image is the result of trade studies that were performed to estimate thrust and weight loading for the UAV.


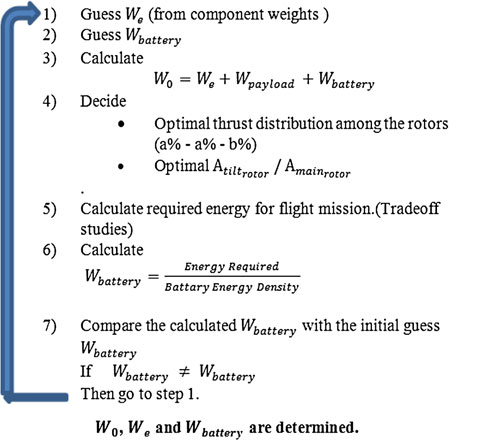
After running initial weight estimation algorithm and performing the trade studies, T/W and W/S were decided along with the thrust distributions for the rotors. The image shows the weight estimation algorithm that was used along with trade studies for determining thrust and wing loading.

1

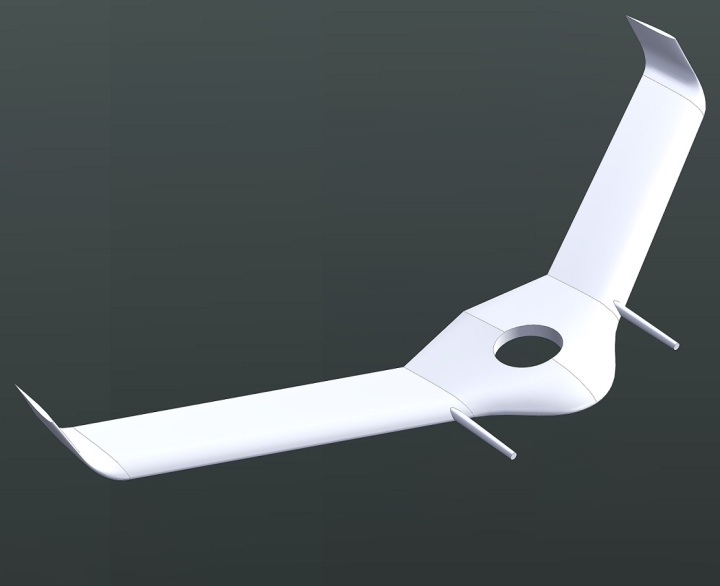
After preparing concept sketches for the UAV, blended wing configuration was selected by keeping in mind the portability and efficiency. Flying wing configuration has a minimal wetted surface area which reduces profile drag significantly. The absence of stabilizing surfaces induces higher maneuverability, which is essential to the UAV. Use of commercially available autopilots will greatly ameliorate the dearth of stability in flight dynamics. Once this was completed we moved to selecting airfoils for the flying wing VTOL tilt-rotor. Different reflex airfoils were analyzed in PROFILI so as to enhance the maximum lift coefficient while limiting the maximum drag. In addition to the flying wing design, blended winglets will be used to enhance the aerodynamic efficiency. Winglets will house the rudder controls for the UAV. 


This image shows the UAV in VTOL mode with the central open hub which we plan to close in cruise flight. Eppler 334 was selected for the central plank section, NACA34112 for the wing plan-form and NACA0012 for the winglet. The next step was to perform preliminary iterations in a basic software like XFLR5 so as to get some results for number crunching.

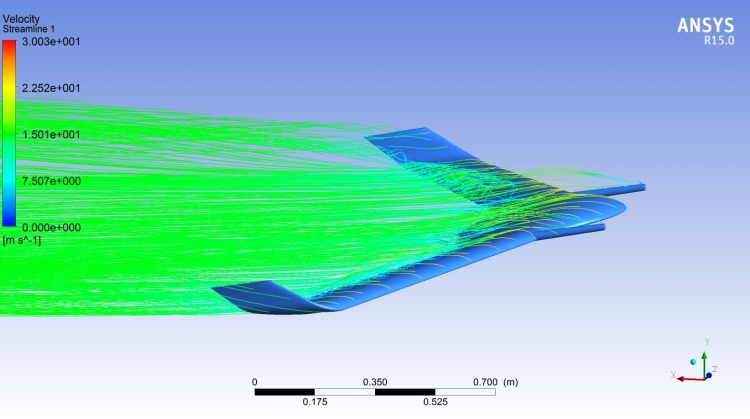
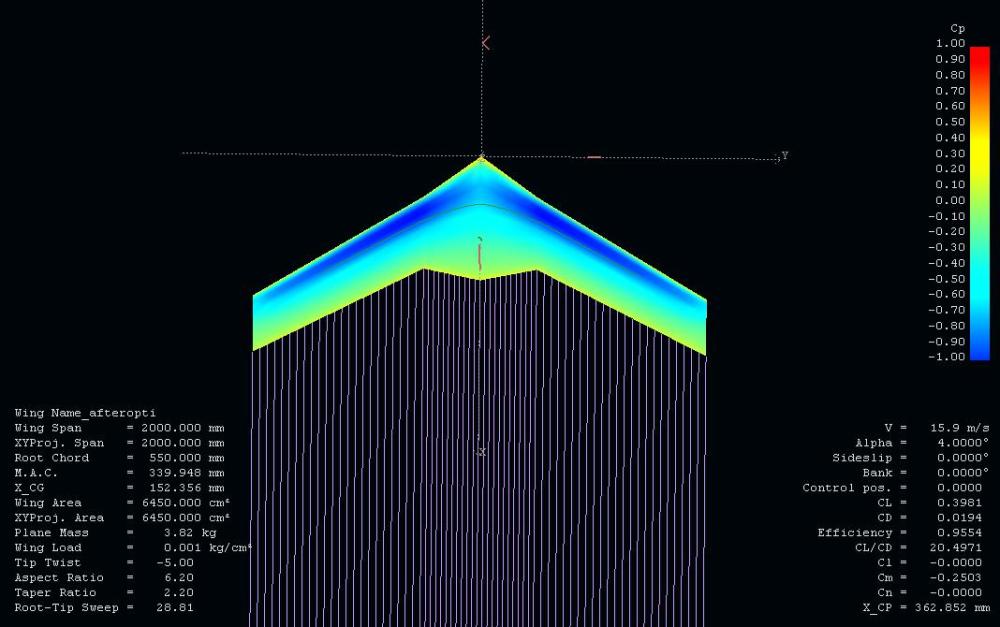
The above image is the result of aforementioned XFLR5 analysis showing the air stream flow around the UAV at trimmed flight of 4 degrees along with the pressure contours. A CL/CD of around 20.5 is achieved which proves the initial guess of superior flying wing efficiency as compared to conventional configurations.

This image shows the side view of the mesh that was generated for CFD analysis. 

 CFD POST

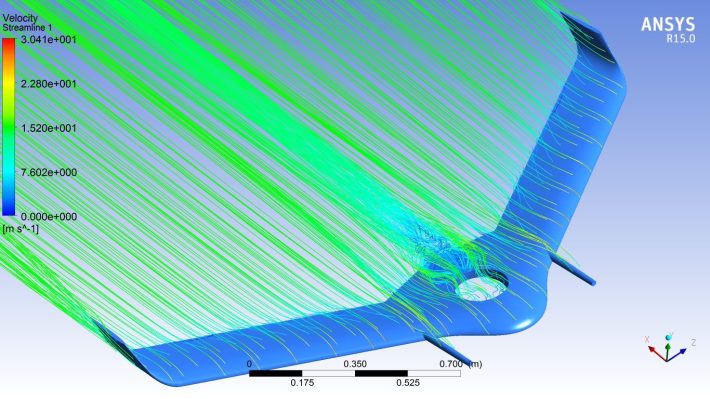
This is flow field around the UAV in cruise flight with the flap open, the drag penalty can be seen clearly in the form of vortices.  


This brings me to the end of my blog post. I’ll update you guys on more once I get some substantial results. 


Looking forward to your expert opinions in the comments below. 

So long and thanks for all the fish.

-Karan 

SOURCE: Everyone’s Blog Posts – DIY Drones – Read entire story here.

u-blox M8N – ground planes, antennas and positional accuracy

Image Roof2.jpg

Hi all,

following my last post on positional accuracy, the discussion about ground planes and shielding as well as the general debate about the M8N, I started a series of tests comparing different M8N modules. This is the first part where I focus on comparing the modules in a bench test to compare positional accuracy.

The setup

I tested the following boards with settings optimized for Ardupilot:

Additionally, I tested the DroTek / M8N / T0027 with an “external” 9cm ground plane.

Since all modules produce low HDOP/PDOP values – around 0.7 and 1.3 respectively – the comparison focusses on positional accuracy/stability. Therefore, all GPS boards were plugged in for 10min before recording. Then I recorded their positions for 10-15min using u-center. Scatter plots of the position errors are used to compare the boards.
As a reference I recorded the GSG EMI in parallel when testing the others.
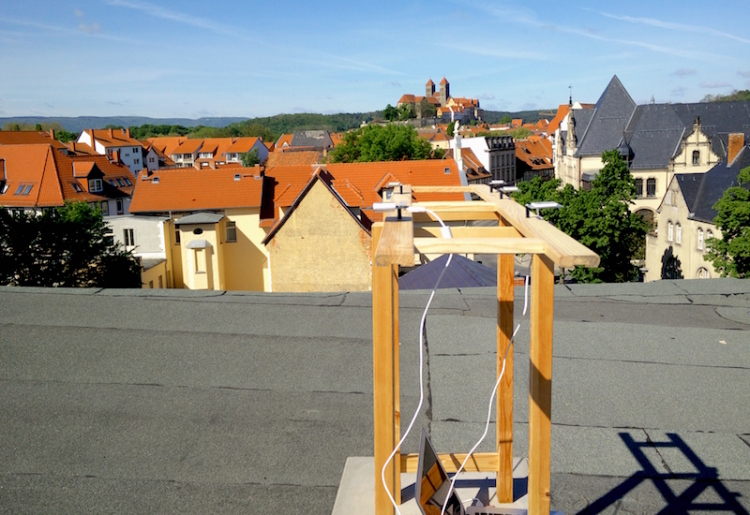
The image above shows the setup on the roof and the image below a closeup of test rig.

DroTek with the additional ground plane:

XY scatter:

Results

  • It is obvious that the CSG EMI and the DroTek with external ground plane outperform all other boards. 
  • The DroTek and the VR show comparable accuracy.
  • The CSG XL shows better performance compared to the DroTek and the VR but is not as good as the CSG EMI and the DroTek with external ground.
  • The 3DR 6H shows a much more scattered distribution.

Discussion

  • The board design (electronics) does not seem to have any influence.
  • Larger patch antennas result in higher accuracies.
  • A larger ground plane results in higher accuracies.
  • The ground plane seems to have a higher influence compared to the antenna.

u-blox provides a diagram (page 19) showing the effect of the size of the ground plane for patch antennas. Unfortunately, the ublox document only lists 18mm and 25mm antennas. For 25mm antennas 7cm for the ground plane seem to be sufficient. For the 35mm it should be larger. 

Remark
The results presented are only from one test. So there is for sure uncertainty. However, I made similar test the past days with comparable results. The 3DR 6H performed better in previous tests but not as good as the M8Ns, which performed not as good as in the results presented above (except the CSG EMI which showed similar results – I have not tested the DroTek with additional plane in previous test).

The next step is to compare the CSG EMI, the DroTek with and without the additional ground plane and the 3DR on a copter to compare the influence of the ground plane as well as of the shielding.

Cheers,
Thorsten

SOURCE: Everyone’s Blog Posts – DIY Drones – Read entire story here.

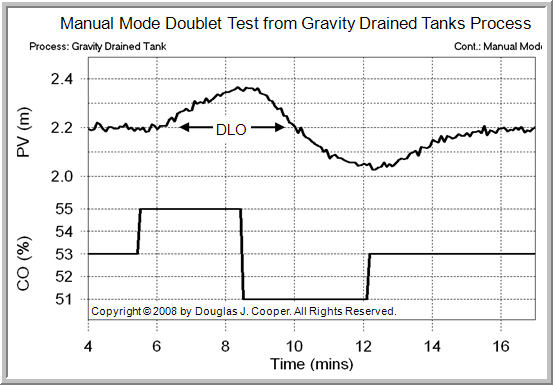
How to configure a flight mode to apply automatic inputs during flight?

Image gdtdoubletbig.jpg

I’m trying to apply automatic inputs at the elevator and aileron during the flight, for which I have configured the CRUISE mode. These inputs are of a specific pattern i.e., doublet(combination of an up pulse and down pulse). 

I have made changes in the code (Arduplane.ino file) as follow

switch (effective_mode)

case AUTO:
handle_auto_mode();
break;

case RTL:
case LOITER:

case CRUISE:

if ((channel_roll->control_in != 0

if (!cruise_state.locked_heading)
nav_roll_cd = channel_roll->norm_input() * roll_limit_cd;
nav_roll_cd = constrain_int32(nav_roll_cd, -roll_limit_cd, roll_limit_cd);
update_load_factor();
else
calc_nav_roll();

update_fbwb_speed_height();

hal.gpio->pinMode(CH_2,HAL_GPIO_INPUT);
hal.gpio->write(CH_2,HIGH);
 hal.scheduler->delay(5000);
hal.gpio->write(CH_2,LOW);
 hal.scheduler->delay(5000);
hal.gpio->write(CH_2,HIGH);

servo_write(1,1800);
 delay(2000);
servo_write(1,1200);
 hal.scheduler->delay(500);
servo_write(1,1500);

break;

                 I was able to successfully compile and upload the code. However once I tried to check the effect of these command lines during ground testing I was unable to observe any of the input pattern once I switched to the CRUISE mode. Desired was the application of a doublet input at the elevator and aileron.

  Would someone please tell me that what could be the possible problem and its solution. Isn’t it that this change is to be done in some other portion of the code because it is done in Arduplane.ino file.

 Thanx  alot……

SOURCE: Everyone’s Blog Posts – DIY Drones – Read entire story here.

Robotshop offers UgCS with autopilot

Image a.jpg

Greetings!
We have some great news for those of you about to purchase autopilots. 
In cooperation with Robotshop.com (and Robotshop.com/eu/) you can now acquire autopilots bundled together with UgCS.
If you are about to get a Pixhawk or an APM autopilot with GPS, you can get the UgCS ONE license on top of that for just a few dollars.

In addition to that you can also get AR.Drone bundled together with UgCS in a similar manner.
For more information please visit www.robotshop.com and www.ugcs.com 

Safe flights,
UgCS Team

SOURCE: Everyone’s Blog Posts – DIY Drones – Read entire story here.

Mapping parts of the biggest lava field for the last 200 years in Iceland

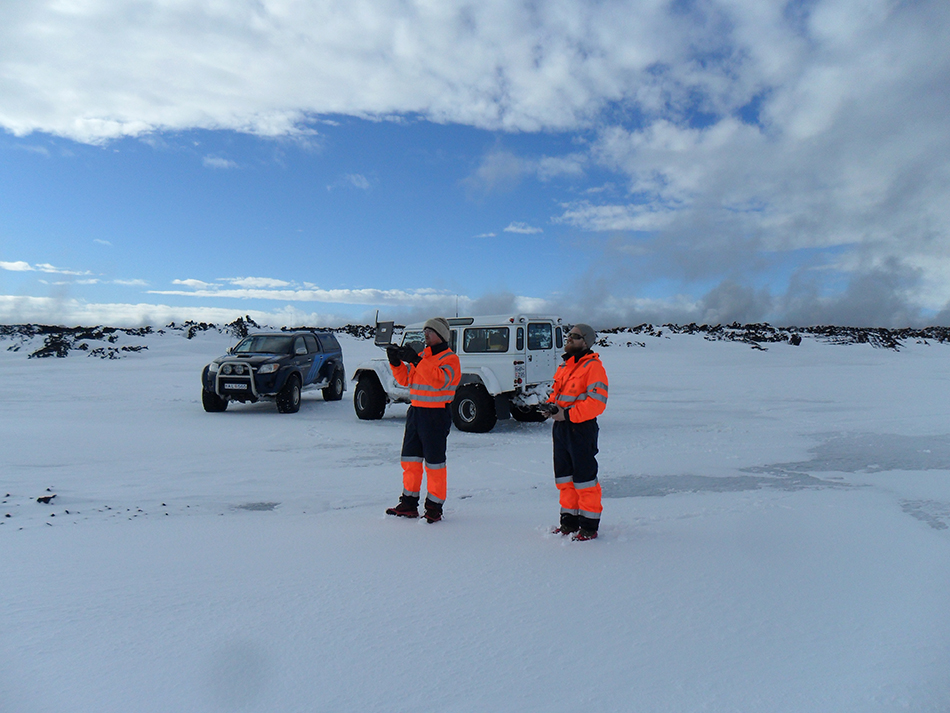
Image SAM_2374.jpg

Hello all

In middle of March we went to map the newly formed lava in Holuhraun Iceland, the biggest lava flow in Iceland for the last 200 years with a size of about 80 km^2 (same size as Reykjavík the capital city of Iceland). The eruption did get some media attention, for example Good Morning America had a live broadcast from the eruption and Discovery Canada made a video about the Scientists working there.


 Me and my friend are operating a UAV service here in Iceland and were lucky enough to be invited with the scientist from the Institude of earth sciences at the University of Iceland to map this newly formed lava only two weeks after the eruption stopped. The area is still closed and only open for scientists with a special permission. The results were stunning and the amount of data we were able to gather with our UAV mapping platform was tremendous. It is very interesting to compare this method with older methods of mapping with a GPS on the ground and only gathering few hundred measured points in one day while this method record millions of points. The scientists do belive that this area will change quite a lot in the coming years and the craters could possibly collapse.

Of course we are using APM for our mapping platform but the UAV we used was built by our self. From the images we created a 3D model of the Lava field and in the video below you can enjoy flying through this new landscape. The 3D model is from the craters and the lava river that once did stream from the craters is quite obvious to in this 3D model.

We did get some attention of the media here in Iceland.

For this project we used a custom built Skyhunter with APM autopilot and PIX4D to generate the 3D model. We did make special ground control flags that can be seen on the image above. All the flags were measured with a RTK-GPS.

All this was made possible by the clever minds on this forum so thanks to all!

SOURCE: Everyone’s Blog Posts – DIY Drones – Read entire story here.

Drones banned on Arctic and Antarctic cruises

Image AntarcticCruiseShip16x9.jpg

From Maritime Executive, via sUAS News:

This week two major associations representing tour operators in the Arctic and Antarctic respectively, have stated that they will not allow visitors to bring recreational Unmanned Aerial Vehicles (UAV) into the regions.

The International Association of Antarctic Tour Operators (IAATO) reached an agreement at its 26 Annual Meeting to forbid the use of the devices for the 2015-16 season. Similarly, the Association of Cruise Operators (AECO) announced today that they will be banning UAVs as well.

The popularity of the flight and camera systems have grown dramatically in the last several years due to the fact that the devices are generally lightweight and inexpensive. Many tourists use the devices to capture photographs and videos of the surrounding landscapes. However, the operation of UAVs may lead to increased noise pollution, disturbances to wildlife and may interfere with scientific work.

AECO said in an online news release that, “Travelers to pristine Arctic areas enjoy unique nature and wildlife experiences, remoteness and silence. AECO finds that some of these values may be at risk if the general use of UAVs is allowed to continue to increase in the Arctic.”

Additionally, any systems weighing it at under 22kg (55lbs) do not require any type of operator certification. This has raised concerns regarding potential pilot errors resulting in lost vehicles or damage to protected areas.

The ban on UAV extends only to use for recreational purposes. IAATO further stated that its ban will be reviewed next year to allow for changes in UAV regulations as well as potential technological advances.

SOURCE: Everyone’s Blog Posts – DIY Drones – Read entire story here.

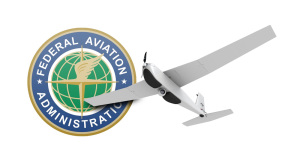
FAA picks Mississippi State to lead unmanned aircraft center

Image FAAPuma1.jpg

FAA Picks…

On one hand this could be a good thing in some respects but is anyone else concerned for the open source entrepreneurial community by this announcement? Introduction of multiple layers of dysfunctional top down bureaucracy, academia, regulation and stifling of real innovation from an exclusionary closed system will not work in the 21st century will it? The bottom up innovations and open driving force in the “drone” community we have all benefitted from in the past few years may eventually disappear from public view down the rabbit hole of a government approved and funded institutional “research” project. All for the public good and safety of course. Did I miss ( and I well could have and do miss this kind of thing) the whole one month long FAA solicitation to institutions for this initiative or was it just decided by someone in Washington?

(COE UAS Final)

What or where was the application process open to the public? Is there an open source lobby effort looking out for or keeping the wider community informed on what is done or proposed in Washington? There really needs to be an open and public non financial or politically invested oversight group to direct and mentor this program separate from any of the entities mentioned.

SOURCE: Everyone’s Blog Posts – DIY Drones – Read entire story here.

APM + Ubuntu + ROS = Elre Copter

Image 11.png

Great to see the progress of the Erle Robotics team, who have ported the APM code to Ubuntu and interfaced with ROS to make a great research platform. From the Ubuntu blog:

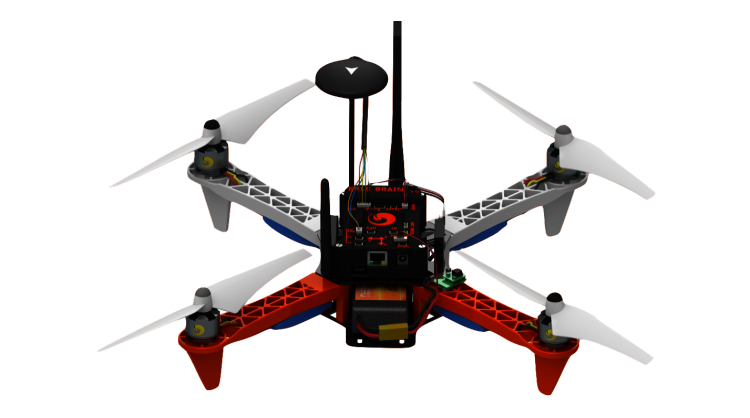
Erle-Copter: the first drone with apps powered by Ubuntu Core

Over the last months and with the support of Canonical, Erle Robotics engineers have been working hard to bring the first drone with apps to the market. Last week Erle Robotics introduced Erle-Copter Ubuntu Core special edition, a smart drone powered by Snappy Ubuntu Core that will stay secure automatically and can be upgraded with additional capabilities from the app store.

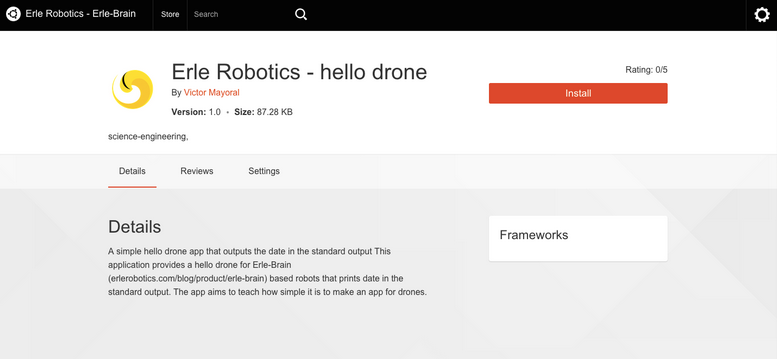
erlerobotics-hello drone

With Erle-Copter’s Ubuntu edition one can install drone apps (behaviors) using any device with a browser connected to the drone. Programming drone apps is done through the Robot Operating System (ROS).

In a few years ROS has changed the robotics field. It has unified Universities and industry around the world, enhanced collaboration, sharing of algorithms and reuse of code. A task that traditionally could take months can be developed within days using ROS. We are true believers of this framework and its possibilities for the future of robotics thereby adopting it as an SDK for robot and drone app development is the right choice for us.” – Víctor Mayoral Vilches, CTO of Erle Robotics.

The Robot Operating System will delivered in Snappy as installable framework for Erle Robotics drones and robots. Developers will be able to build applications using ROS and put their algorithms in the app store.
Erle Robotics open platform aims to attract innovators and experts to collaborate and compete with open drones and robots for education, research and invention. The drone will be shown at IoT World during this week.

SOURCE: Everyone’s Blog Posts – DIY Drones – Read entire story here.

Improving the RV-Jet Airframe

Image SideView.JPG

If anybody out there is using an RV-Jet airframe and finding that you have some serious wing loading problems because you’re simply carrying to much weight on board, take a look at my newest blog post on one possible solution you might be able to use.

SOURCE: Everyone’s Blog Posts – DIY Drones – Read entire story here.

Survmatic Australia Nullarbor Ortho Quad

Image 08Aug2014003.73.jpg

We are an Aussie based start up with a 20 year history in traditional aerial survey with both helicopter and fixed wing platforms. We are also a CASA licensed UAV operation with our own custom made products.

We would like to introduce our mapping quad called the Nullarbor (because its flat, Aussie humour) with an integrated 2 axis gimbal. We wanted a simple 25 min UAV that had the ability to easily pull the camera. We use a 6200 mah 4S and T motor/12 inch props combo.  We like to use the French made Dropix or the Autoquad for this unit, 

The product is made in ABS with both CNC and 3D printing along with carbon tubes etc. We are currently selling this model ready for your mapping missions. we designed this build over 12 months ago.

We have also designed our own controller based on a Spektrum 9 with RFDesign radios and our own custom battery charging system.

In case you were wondering..  Yes its all real..

and the controller

SOURCE: Everyone’s Blog Posts – DIY Drones – Read entire story here.